Using the ‘Add Drawings to Vault’ command you will be able to easily add selected drawings to Autodesk Vault from a specific folder and underlying subfolders.
After clicking 'Add Files', the selected drawings will be opened one-by-one, automatically executing the 'Check In' command. Any 2D drawings that already exist in Autodesk Vault will not be checked in. The command is only intended for adding new 2D drawings and underlying Inventor files.
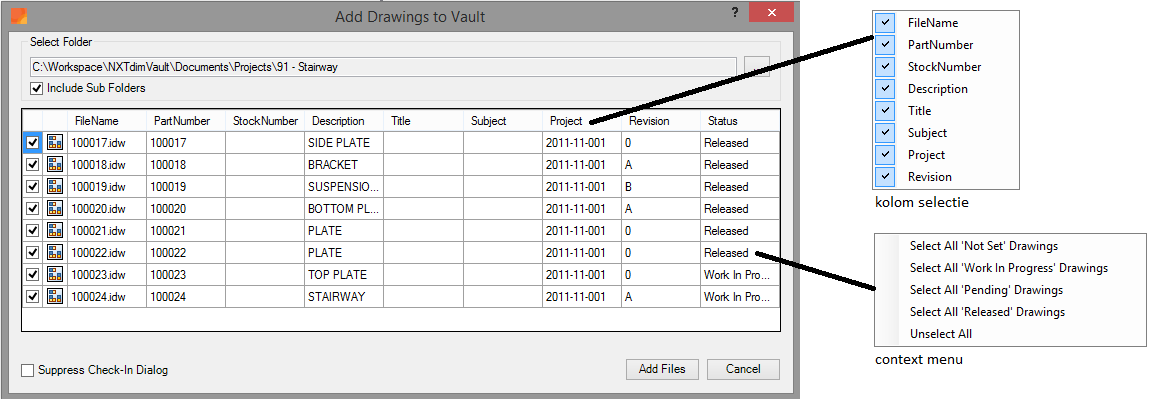
In the image below a sample of the dialogbox is shown. The overview shows a set of iProperties from the drawings in the folder. Columns can be toggled on and off, by right-clicking on the column headers.
By pressing the right mouse button anywhere in the list, you will be presented with a contextmenu. You will be able to quickly select drawings based on a certain status. If desired, manually checking one or more drawings is also possible.
The command has two different start options:
If there are no open documents in Inventor when launching the command, the 'Project Browser’ will automatically be opened. It allows to select a folder. If the 'Include Subfolder’ checkbox is active, also the drawings in underlying subfolders will be shown.
If there is a document active within Inventor when launching the command, the 'Project Browser’ will directly display all drawings in the folder where the active document is saved. Using the 'Browse’ button, you can select drawings in other folders.
Remarks:
Only new 2D drawings will be added. Any drawing selected that is already checked-in in Autodesk Vault will be skipped.
Before the selected drawings are actually checked-in, the regular 'Check In' dialogbox will be shown. You must click 'Ok' to confirm the check-in. Use 'Suppress Check-In Dialog’ to hide the 'Check In' dialog while checking-in your files to Autodesk Vault.